|
IOLMaster — Keratometer Measurements.
 |
|
IMPORTANT:
Now and then, there are reports on different K readings on the IOL Master
as compared to other keratometers. Also, discrepancies in IOL powers
are reported comparing IOL Master results with those obtained on ultrasound
equipment, even when the same input data was used.
Very often, the described problems can be traced down to keratometer
indices and/or to peculiarities of corneal power implementations in the
IOL formulas of the respective instruments.
|

Measurement of Corneal Curvature (KER)
1. Activate Keratometer Measurement Mode:
- clicking on the KER icon
- pressing the
<K> key
- pressing the <SPACE BAR> in ALM mode (ALM)
2. Tell the patient to focus on the yellow light  . .
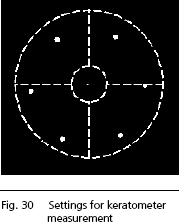
3. Align the IOLMaster.
The 6 peripheral
measuring points should be symmetrical to the circular cross-hair and appear
optimally focused. The central point is usually not
focused and is not evaluated
for keratometer measurement. The IOLMaster with Advanced Technology indicates
the optimum measurement setting by means of a green traffic light.
|
|
Note
Ensure that all 6 peripheral points are visible and located in the
field between the two auxiliary circles on the display. It is
recommended that the patient blink his/her eye shortly before
the measurement to produce a continuous tear film. This will
improve the reflectivity of the cornea. The measuring points
should be circular or ellipsoid. If the measuring points are
irregular (i.e. corneal scar), measurement is not possible. Precise
measurements are possible only if the 6 peripheral measuring
points appear optimally focused on the display. |
|
|
 |
4. Take the measurement by pressing the button on the joystick.
Depending on the setting under Program settings/Program, a traffic
light will assist in finding the optimum measurement setting. When the optimum
measurement position has been reached, the traffic light
will change from red to yellow to green. Once the optimum measurement setting
(green traffic light) has been reached and remains constant for all three measurements, pressing
the knob on the joystick in Automatic mode (Automatic
activated) will trigger
three consecutive measurements. The automatic measurement procedure will be
interrupted if the optimum measurement setting (green light) wavers and is
resumed when the optimum setting is reinstated.
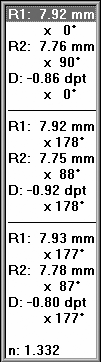
Five internal individual measurements are taken for a single keratometer measurement
within 0.5 seconds. Following this, the radii or corneal K’s (depending
on program settings) of the two main sections will be displayed, together with
the respective axial orientation and the astigmatic difference. In the case
of a spherical cornea, only the radius or a corneal K will be displayed, but
no axial orientation or astigmatic difference. A blue
progress bar in the status
bar will indicate the progress of computation.
 |
|
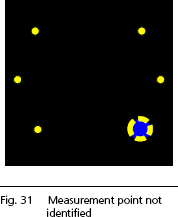
The size and shape of measurement points are verified by the software.
If a measurement point is not correctly identified, a blue
flashing dot
will appear. In the printout this will be marked by an x. These readings
should not be used and a new measurement should be taken as a
precaution.
Keratometer measurements may be repeated as often as desired;
however, only the last three measurements will be displayed. |
|
|
Note
The number of measurements is crucial here. The IOLMaster requires
THREE keratometer measurements to be taken! The message Measure again will
thus appear. Only then will a mean value be passed on to the IOL calculation
and an evaluation enabled. |
|
|
Note
In some cases (keratoconus, keratoglobus, corneal lesions, etc.) it
may not be possible to reach the green traffic light. In such cases
the traffic light display can be briefly deactivated, enabling a
measurement to be taken even when the light is on yellow or red.
To do this, press the <M>
key. The Automatic display will
disappear. However, now pay attention to the correct setting, as
described above. Press the <M> key once again to reactivate
automatic. Automatic will always be switched back on for a new
patient. |
|
|
To delete one of the three displayed readings, select it and press the
<DEL> key. Now confirm with YES. If the last three readings differ by > 0.5 D (mean value of the spherical
equivalent of the last three measurements) or if the tolerance of the
mean radius of the last three readings of 0.08 to 0.1 is exceeded
(dependent on n), the Evaluation! message will
appear on the screen.
- In this case, check the tear film of the eye being examined, ask the
patient to blink if necessary and repeat the measurements until the
results are within the tolerances. The Evaluation! message will then
disappear.
- Potential measuring errors (inaccurate measurements) must be deleted
as necessary, since the readings obtained in the Evaluation! state will
not be accepted for ACD measurement, IOL calculation and the database for
optimization of constants.
 |
WARNING:
To obtain consistent results check
the individual keratometer measurements and carry out further
measurements if necessary.
|
|
The following plausibility tests will be made with the keratometer
reading:
- R > 8.4 mm
 Possible
flat corneal curvature, keratoglobus Possible
flat corneal curvature, keratoglobus
- R < 7.2 mm
Very steep corneal curvature
- R < 7.0 mm
Possible keratoconus
- |R1 - R2| > 0.5 mm
High astigmatism
When both eyes have been measured, the difference in the keratometer
readings between the right and left eye will be checked. If this exceeds
0.2 mm or 1 D, you will be prompted to check the readings once again.
If this warning appears, be sure to verify that no pathological changes
have occurred in the eye. It may be necessary to repeat the
measurements. Only confirm the warning with OK if you are certain
that the readings are plausible. Otherwise, determine what has caused
the implausible readings. A reference to the displayed plausibility test
message will be transferred to the comments box.
|