|
IOLMaster — Setting Up.
The IOLMaster must be set up and commissioned by an authorized
representative of Carl Zeiss; the latter will also instruct the users on the
operation of the device.
In general, Carl Zeiss Service will perform the following operations.
Installation:
-
Remove and unpack box containing accessories.
-
Carefully remove the device from the box (the device not should be
lifted or carried by the measuring head).
-
Removing shipping braces:
-
Loosen device lock knob.
-
Basic setup: Turn joystick clockwise (one turn) to move the
device upward and pull out the red plate underneath the base axis
(patient side).
- Remove red pads from the wheel housing of the IOLMaster base.
 |
|
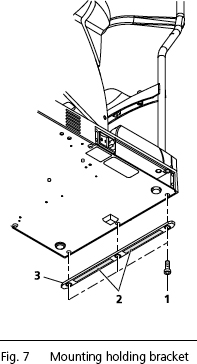
Secure with Holding Bracket
The IOLMaster can be permanently secured with the aid of a holding
bracket (3, Fig. 7). The holding brackets are provided in two sizes:
-
7 mm thickness, for securing to the instrument table
-
5.5 mm thickness, for securing to the keyboard support
The different sized holding brackets are both mounted in the same way.
Make sure you use the correct holding bracket for each location.
 IMPORTANT: Do
not lift or carry the IOLMaster by the measuring head! IMPORTANT: Do
not lift or carry the IOLMaster by the measuring head!
-
Tilt the IOLMaster to one side so that it rests on the patient head
support.
- Remove the three hexagon socket (Allen) screws (SW3) (1, Fig 7). The
screws may be very difficult to loosen.
|
IMPORTANT: Do
not remove any other screws on the base plate!
Removing other screws may damage the IOLMaster!
-
Attach the holding bracket with adhesive strips (2, Fig. 7) facing
outwards.
- Secure the holding bracket with the three hexagon socket screws. Do
not yet remove the protective film from the adhesive strips.
- Set the device upright and place it in the desired position.
- Now lift/tilt the device slightly and remove the protective film
(2, Fig. 7).
- Be diligent in bringing the IOLMaster carefully into the proposed position,
as the adhesive strips will take hold immediately and the IOL Master may not
be shifted once it has been brought into position!
Electrical Connection:
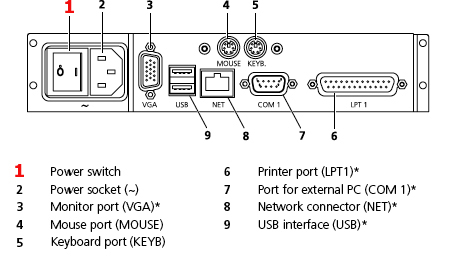
- Connect mouse and keyboard
- Optional: Plug in and secure monitor (VGA) and interconnecting
cable (NET/COM 1)!
- Connect power cable.
- Turn on the power switch (1, above). When the IOLMaster is turned
on at the power switch, it will run through an internal test, after which
the Patient
Manager screen will appear.
- Install printer as shown to the right in Fig. 8.
- Check the Measurement Functions.
IMPORTANT: Use
only printers recommended by Carl Zeiss
Meditec.
Only one printer
may be installed. De-install all surplus printer drivers using the menu
Setup - Printers.
Prior to using an older printer, pleas consult with Carl Zeiss
Meditec whether the printer is approved for use with the IOLMaster.
 WARNINGS: WARNINGS:
* If connecting external devices, e.g. an external PC, to the connectors
or an external monitor to the VGA connector, the operator must ensure to
meet the safety requirements as per DIN EN 60601-1-1 (medical electrical
systems)!
A network isolator can be ordered from Carl
Zeiss Meditec for connection to an
external network (NET). The IOLMaster may only be connected to private
networks which are protected from public networks (Internet) by firewalls
conforming to the latest technical standards.
Certain operating parameters are factory set and
may be changed in the Setup Menu.
|
|
Installing the Printer: 
|
Printer Setup
Click on the Options menu > Setup > Add Printer.
This will bring up a dialog box for selecting and configuring the printer.
The options available will depend on the individual printer hardware and software.

If you encounter any problems during printing, first remove all printer drivers
you do not use:
-
On the Options menu, select Setup > Add Printer.
-
From the printers window select the icon for the connected printer (e.g., Epson Stylus Color 880). Right click to view the drop down menu. Select Set as default.
-
Select the printers not connected (except for the "Add Printer" icon) and press the DEL key. Follow the instructions displayed on the screen.
-
Close the Printer folder again, when the un-install routine is finished.
If the printer troubles should persist, please call your service representative.
In the United States call Carl Zeiss Meditec Customer
Service, Ophthalmic Division at:
877-486-7473.
|