IOLMaster — Servicing and Maintenance.
Care of the IOLMaster
  |
WARNING:
Before cleaning the IOLMaster, switch it off and
pull the power supply plug.
When cleaning, the greatest care must
be taken to prevent moisture from penetrating the IOLMaster or keyboard,
as this may cause damage.
|
- All parts of the casing may be wiped off with a moist, but not dripping-wet,
cloth. Wipe off any marks or stains with distilled water, to which a drop
of household washing up liquid has been added.
- Never use aggressive or abrasive cleaning agents.
- Use conventional cleaning cloths for wiping off the display and keyboard
of computers and monitors.
- Contaminated parts with which the patient has come into contact during
the examination (chin rest, forehead rest) should be cleaned with a disinfectant
approved for the purpose. These parts are resistant to wiping off with low
toxic agents (e.g. suds, quaternary ammonium compounds) and intermediate
agents (e.g. alcohol, Javel water, iodine; classification pursuant to: Disinfectants
and activity spectrum according to the Center for Disease Control and Prevention,
Atlanta, USA).
- Remove dust from optical surfaces by means of a fine brush.
- If necessary, carefully clean these surfaces with a water-free ether/spirit
mixture (9:1) applied with a cotton swab. The swab or lens-cleaning instrument
should be moved with a circular motion from the center of the lens to the edge.
Ensure that the regulations for inflammable liquids are observed,.
- When not in use, the IOLMaster should be covered with the dust cover
provided to protect it from dust.
- The packaging material should be kept for future relocation or repair
of the IOLMaster, or it may also be returned to the supplier as required.
Restarting After Failure
 |
IMPORTANT:
Pulling the main plug or cutting off the power while the IOLMaster is
running may cause a loss of data and/or defects in the IOLMaster's control
software. However, no danger to the patient or user ensues as a result. |
If the system fails during operation, take the following steps to restart:
-
Switch on the power supply at the power switch (1, Fig. 9).
An automatic test program will run before Windows is launched.
Once this has been successfully completed, Windows and the IOLMaster
program will be restarted and work can be resumed.

Test Eye— Verifying Measurement
Functions
|
After switching on, the IOLMaster will prompt a daily calibration check
prior to patient measurements. Upon confirming with OK, a check will
be performed of measuring functions and work on the device can begin.
The test eyes supplied with the IOLMaster (1,
Fig. 77) are for verifying that the IOLMaster is serviceable and
properly calibrated.
Measurements can be
performed on these test eyes the same as with a human eye. Last, first name
and date of birth are mandatory here as well. The supplied scale is to be
used for checking the WTW value (an optional function).
|
WARNING:
The calibration must be checked every day before
starting measurements on a patient. The measured values can
be printed out and filed for documentation purposes. If the values obtained
from the test eye are not within the given tolerances, no patient measurements
may be taken. The IOLMaster must be shut down immediately and secured
against inadvertent use. Then notify Carl
Zeiss Service.
|
- Insert the asymmetrical holder (5) into the holes adjacent to
the chin rest - the holding pins for the paper pads (4), may
need to be removed beforehand.
|
|
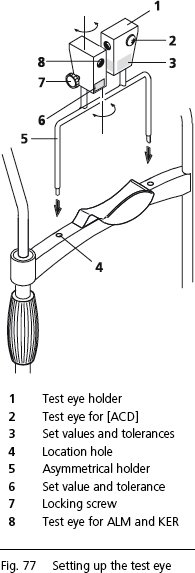 |
The test eye (1, Fig 77) is secured by a locking screw and mounted on a mandrel
which allows it to rotate (7, Fig 77). The respective set
value and tolerance (3 and 6, Fig 77) for checking the calibration
status are marked on the test eye (1, Fig 77).
In the delivery condition, the Test Eye patient has been entered
and named !CHECK
DEVICE!,
with a birth date of 01/01/1911. Because
of the exclamation mark in front of the name, this "patient" will
always be at the top of the patient tree in the Patient Manager and
can thus be easily found every day for test purposes.
-
Highlight the patient !CHECK DEVICE! and click on New.
Axial Length Measurement (ALM) and Keratometer
The test eye (8, Fig. 77), marked with AL, R, the respective set values
and tolerances (6, Fig. 77) is used for checking the axial length
measurement (AL) and keratometer (R).
The measurements should be taken in the same way as for a human
eye.
If the readings (in the case of the keratometer, the radius) are within the
tolerances stated on the holder (6, Fig. 77), the IOLMaster is properly
calibrated.
Anterior Chamber Depth (ACD) Measurements
The (larger) test eye (2, Fig. 77) on the side of the test eye holder
(1, Fig.
77) (marked with the ACD, set value and tolerance) is for checking the
anterior chamber depth measuring device. Before starting
measurements, the surface structure simulates the cornea and must
therefore be clean and grease-free (wipe off with a dry cloth!).
- The measurements should be taken in the same way as for a human
eye. On the video screen verify that the adjustment criteria for an
optimum optical section are correct, as for measuring the ACD on
the human eye.
- Here again, if the measured values lie within the given tolerance, the
anterior chamber depth measurement is functioning correctly.
IMPORTANT:
Although the side (right or left on the simulated eye) is immaterial for
checking the axial length measurement and keratometer (because
the optical path for the measurements is rotationally symmetric), when
checking the anterior chamber depth measurement it is recommended
that the asymmetrical holder (5, Fig. 77) be reversed and the check
performed on the other side. When comparing right and left, however,
care must be taken to ensure that in both cases the test eye (2,
Fig. 77) stands exactly vertically in front of the IOLMaster.
 |
|
Note
The test eyes are ideal for practicing the operation
of the IOLMaster. |
The status of the Test Eye is also reset each time a new
patient (<N> or "new patient" icon) is admitted.
|
WARNING:
If the test eye readings are not within the given
tolerances, the IOLMaster must be shut down. Notify Carl
Zeiss Service. |
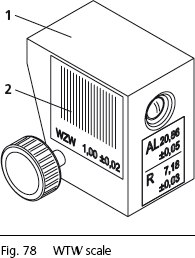
Verifying WTW Measurements (an optional function)
The WTW scale (2, Fig. 78) is
for verifying the WTW reading.
- Take a measurement using the test eye.
If the reading is within the tolerances, the WTW determination is
properly calibrated.
|
|
Note
The WTW scale must completely fill the video window. The scale
(black lines) must appear in focus. |
|
|
 |
 WTW calibration Printer Troubleshooting
Use only printers recommended by Carl Zeiss Meditec.
The printer models listed on that website have been tested in conjunction with
the IOLMaster and, provided the instructions for Setting
Up the IOLMaster have been observed, the
IOLMaster printer system will operate reliably.
Should printing problems occur, delete all printer drivers not used, as follows:
- Click on Printer from the Options — Setup pull-down
menu.
- Select the connected printer and designate it as the standard printer
(check the appropriate box in the File menu).
- Open the queue by double-clicking on the standard printer and delete all
print jobs in the list by highlighting and pressing the <DEL> key.
- Select the printers not connected (except New Printer) and press
the
<DEL> key. Follow the prompts appearing on the screen.
- Re-close the printer file once the unwanted printer drivers have been
removed.
If the printer problem persists, notify Carl
Zeiss Service: 877-486-7473
If you connect a printer yourself, it may be connected to either the USB
or LPT 1 parallel port. Please note that the printer must be compatible
with Windows® XP (driver). To install, see: Setting
Up the IOLMaster.
Safety Inspections
To ensure it remains in perfect operating condition, the IOLMaster should
undergo an annual safety check (visual inspection, protective conductor
resistance and discharge current measurement). The safety checks must
be carried out by an authorized Zeiss specialist.
Please observe national safety regulations.
|